


For travelers, the ability to put photos and memories online in Facebook albums, slideshows, and blogs is almost perfect: It’s fast, convenient, and those memories are accessible just about anywhere to just about everyone.
But if you’ve been adding photos and sharing memories on the cloud for quite some time only to find the process distancing, making a travel scrapbook might be the perfect way to get hands-on with your adventures again.
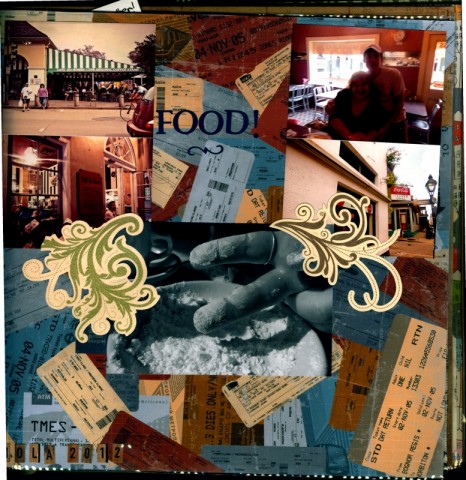
What’s your “scrapbooking style?”
In my experience, scrapbook aficionados generally shake out into three groups, and once you figure out your scrapbooking style, it’s easier to begin collecting supplies — and cheaper, since you won’t buy things you don’t need!
- The photo-focused — You’re not that interested in designing a layout; you just want to have a physical place to display all of your fabulous photos!
- The journalers — You’re also not particularly wowed by artistic page designs, but you have lots of stories to tell.
- The crafters — You’re mesmerized by all things twee and glittery and have never met a sticker you didn’t like.
For the photo-focused:
Project Life scrapbooking can be a great fit. This style is generally reminiscent of traditional photo albums. The most recognizable aspect of Project Life scrapbooking is the individual photo pockets built into their clear, plastic page protectors and the pre-cut (and coordinated) cards for decorative and journaling purposes.
For the journalers:
“Smash books” are a good combination of traditional journals and mainstream scrapbooks. Official smash books are manufactured by K and Company, but you can easily transform a plain diary or spiral notebook into your own unique version.
For the crafters:
Crafters can’t go wrong with a 12 x 12 album — the 12 x 12 supplies tend to be the most plentiful and, therefore, the cheapest and easiest to find in non-specialty shops. You’ll mostly be using non-divided 12 x 12 page protectors to showcase your page layouts.
All this being said, don’t be afraid to mix and match styles within one album; the process of preserving your travel adventures is supposed to be a fun way to reminisce. There is no right or wrong way to scrapbook!
If making a travel scrapbook sounds like it might be just the way to preserve your memories, check out these helpful tips.
1. You don’t need to spend a lot of money.
Buying large packs of plain-colored, 12 x 12 scrapbook paper and/or “craft packs” is the scrapbooking equivalent of buying in bulk: It’ll save you money, and the supplies will last longer.
Packs of plain-colored, 12 x 12 scrapbook paper can be easily cut down for use in Project Life or smash book albums, and craft packs come with a coordinated set of stickers, papers, and embellishments usually designed around a broad theme like “family time” or “four-legged friends.”
Just make sure that any supplies you buy (especially pens, stamping ink, and adhesives) are labeled “archival safe” or ‘”acid free.” After all, you want to put your time, effort, and money towards creating a lasting memory.

2. Hoard, hoard, hoard!
Especially if you want to keep your scrapbook spending under control, it behooves you to develop a hoarding habit.
Grab a few extra copies of everything handed out at tour kiosks and of programs, flyers, etc. from the landmarks you visit. You can experiment with these, using paper punches to transform street maps into creative shapes or cutting playbills into strips to create frames for your favorite photos.
3. Don’t be afraid to time travel.
Let’s say you get hooked on scrapbooking, create a beautiful album of your latest trip, display said album prominently on your coffee table, sit back to admire your work, and immediately begin to bemoan the fact that you didn’t discover scrapbooking earlier. That trip to Indonesia would have made the perfect album!
Never fear: Scrapbooking ‘retroactively’ is perfectly acceptable!
You probably won’t have as many of the kinds of souvenirs described in Tip #2 with which to gussy up your pages, so if you’re a traditional scrapbooker or smash book-er, try integrating some Project Life style pages to shift the focus to your photos instead.
4. Take advantage of ‘free prints’ offers.
In this age of digital photography, even those of us who take lots of pictures tend to favor online cloud or hard-drive storage. Since we’re no longer used to spending money on physical prints, this cost can be a psychological hurdle to scrapbooking.
Especially around major American/Western holidays (Halloween, Thanksgiving, Christmas, Mother’s Day, 4th of July, etc.), sites like Shutterfly offer generous free prints deals, usually giving out 100+ free, 4 x 6 prints for just the cost of shipping. Sign up for their e-mail blasts to get the coupon codes!
If you can’t wait to start scrapbooking, and you’re looking for low-cost prints year-round, Walmart (in-store or online) has the lowest prices I’ve been able to find (averaging $0.10 a print versus the $0.15 charged by other all-in-one stores like Walgreens.
Are any of you dear readers scrapbooking converts? What got you started? How does scrapbooking help you remember your travels? Share in the comments!
Pin it!

Featured image by Flickr user Geneva Vanderzeil apairandasparediy.com.


